Unity3D mecanim杂记

以下皆以4.5左右版本Unity3D为准

1:Layer

Mecanim的layer可以在一个角色上播放超过一个动画。
较高的layer会盖过下面的layer, 不过layer 0以外的layer weight预设是0, 要set为1才会播放。
例如layer 0是站立或跑走的动画 layer 1是 挥剑的动画
用body mask控制layer 1只影响上半身
脚本中要挥剑就 Animator.SetLayerWeight(1,1f);
完成后Animator.SetLayerWeight(1,0f);

base layer以上的新layer初始的weight值是0, 一定要用script將weight改成1才可以播动画
当base layer和new layer同時播放影响同一关节的动画时,会只播放层数高的layer

这些后来增加的层的权重在运行的时候默认是0的,也就是没有影响,需要自己在初始化的时候或者特定需要的时候设定层的权重。(使用animator.SetLayerWeight)

http://docs.unity3d.com/Documentation/Components/class-AvatarBodyMask.html/
http://docs.unity3d.com/Documentation/Manual/AnimationLayers.html/

2:AnimatorStateInfo

AnimatorStateInfo stateInfo = animator.GetCurrentAnimatorStateInfo(0);
if (stateInfo.IsName("Base Layer.RifleIdle"))
{
    //Debug.Log("stateInfo.length:" + stateInfo.length);
    //Debug.Log("stateInfo.normalizedTime:" + stateInfo.normalizedTime);
    //if (stateInfo.normalizedTime >= stateInfo.length)
    if (stateInfo.normalizedTime >= 0.01f)
    {
        gun.transform.parent = leftHand.transform;//先设置父子关系,再设置位置和旋转。否则会出现闪烁。
        gun.transform.localPosition = leftHandLocalPos;
        gun.transform.localRotation = Quaternion.Euler(leftHandLocalRotation);
    }
}

Animator.GetCurrentAnimatorStateInfo(int layerIndex)//注意该函数最好在update中调用,返回的才是当前实时的animatorStateInfo。若放在Start函数中调用的话,获得的只是启动时候的状态~

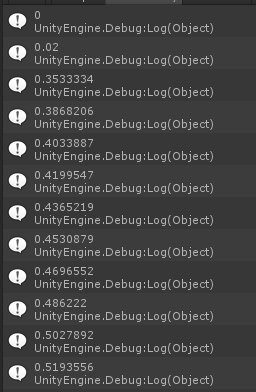
AnimatorStateInfo.normalizedTime
Normalized time of the State.
The integer part is the number of time a state has been looped. The fractional part is the % (0-1) of progress in the current loop
normalized time

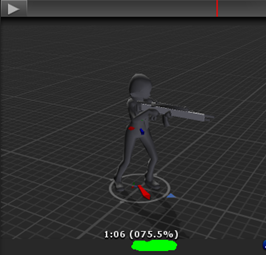
AnimatorStateInfo.length
Current duration of the state.
In seconds Can vary when the State contains a Blend Tree.

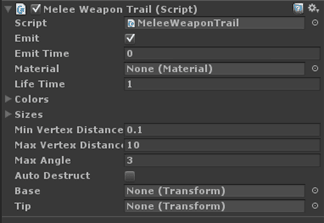
3:Animation Clip Inspector

http://docs.unity3d.com/Documentation/Manual/RootMotion.html/
http://docs.unity3d.com/Documentation/Components/class-AnimationClip.html/
Animation clip inspector
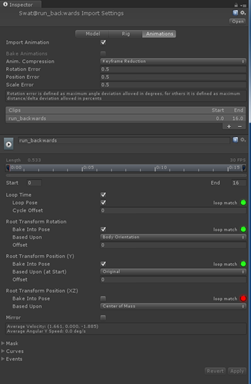
Bake Into pose勾选后,人物就不能跟随动画进行位置的改变相应。
不勾选,人物可以跟随动画进行相应位置的改变。

4:Overriding Root Motion

MonoBehaviour.OnAnimatorMove()
Callback for processing animation movements for modifying root motion.
This callback will be invoked at each frame after the state machines and the animations have been evaluated, but before OnAnimatorIK.

public class Example : MonoBehaviour {
    void OnAnimatorMove() {
          Animator animator = GetComponent<Animator>();
        if (animator) {
            Vector3 newPosition = transform.position;
            newPosition.z += animator.GetFloat("Runspeed") * Time.deltaTime;
            transform.position = newPosition;
        }    
    }
}

一个常规的通过characterController控制移动的写法:

void OnAnimatorMove()
{
    Vector3 deltaPosition = animator.deltaPosition;
    if (controller.isGrounded)
    {
        xVelocity = animator.GetFloat("Speed") * controller.velocity.x * 0.25f;
        zVelocity = animator.GetFloat("Speed") * controller.velocity.z * 0.25f;
    }
    verticalSpeed += Physics.gravity.y * Time.deltaTime;
    if (verticalSpeed <= 0)
    {
        animator.SetBool("Jump", false);
    }

    deltaPosition.y = verticalSpeed * Time.deltaTime;
    if (!controller.isGrounded)
    {
        deltaPosition.x = xVelocity * Time.deltaTime;
        deltaPosition.z = zVelocity * Time.deltaTime;
    }
    controller.Move(deltaPosition);

    if ((controller.collisionFlags & CollisionFlags.Below) != 0)
    {
        verticalSpeed = 0;
    }

    transform.rotation = animator.rootRotation;
}

5 :OnAnimatorIK(int layerIndex)

常用方法:
animator.SetIKPosition(AvatarIKGoal.LeftHand,…);
animator.SetIKPositionWeight();

animator.SetIKRotation
animator.SetIKRotationWeight

animator.SetLookAtPosition
animator.SetLookAtWeight  

6:一些技巧:

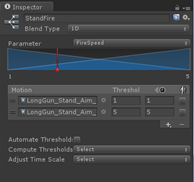
6.1:控制blendTree中motion的动画速度

blend tree1
FireStatus参数控制,是蹲下射击还是站立射击。

blend tree2
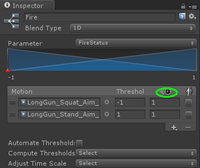
如上图,通过修改绿色圈的速度可以修改该动画的播放速度,从而提高射击速度。但是目前版本4.3还没有提供直接的api用代码控制它。虽然可以通过设置animator.Speed来整体提高速度,但是会影响到其它动画,可控性很低。
可以通过每个动画单独设置一个blendTree,该blendTree使用两个motion,且这两个motion都添加这个动画,然后设置最低速度、最大速度。然后用一个float型变量控制在这两个motion之间切换。如下图:

blend tree3

blend tree4
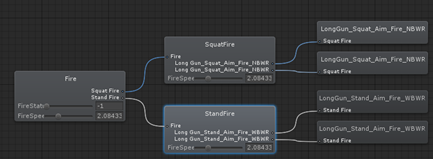
这样在程序里结合使用FireSpeed参数来控制射击速度了。

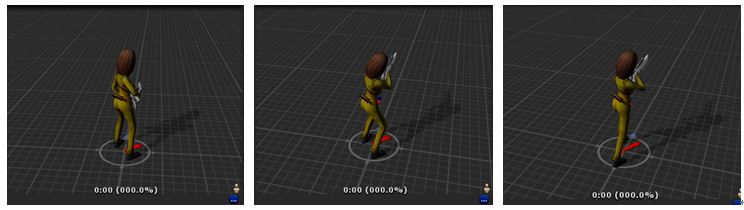
6.2:动画覆盖时候的参数设置解决覆盖扭曲的问题,如站立射击,跑动射击

这里以站立射击,跑动射击为例说明。涉及到的动作有:站立idle状态,站立射击状态,跑动瞄准状态,跑动射击状态。如下图(跑动射击和跑动瞄准不容易区分这里不示意了)。

模型动作示例图
常规做法是站立、跑动放一个layer,射击动作新建一个layer,通过mask,使得下半身不动。调整weight为1,使得射击动作的层覆盖weight较低的层(base layer的weight为0),这里注意一点,weight不一定设置为1,weight值越高则可以覆盖低weight的动作,而且weight值还形象自身动作的力度,weight=1,则按照最大动作幅度表现动作,weight=0.5则动作幅度只有原来的一半。
需要注意射击层的Blending属性。

mask blending type
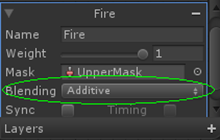
Additive是在原来动作的基础上只添加新的动作。
Override是覆盖原来动作。
如从站立过渡到站立射击状态,若这里选择的是Additive。相对于站立动作,射击动作就一个手部的抖动,因此现在的动作就是站立手部抖动,看起来蛋疼且莫名其妙。若选择的是Override,一切完好。若非要用Additive不可,那么还需要一个站立瞄准的动作,切换到射击状态前,确保人物已经切换到站立瞄准的状态了,这样在站立瞄准的基础上Additive的射击就不会蛋疼了。
跑动射击的话,我们在跑动瞄准的基础上Additive射击的动作自然没有问题,问题是若使用Override方式的话,很蛋疼。上半身枪口的指向不再是正前方。。。个人猜测是跑动瞄准的脊柱和射击动作的脊柱不一致吧。。。

6.3:RootTransform Rotation BasedUpon参数设置

BasedUpon参数
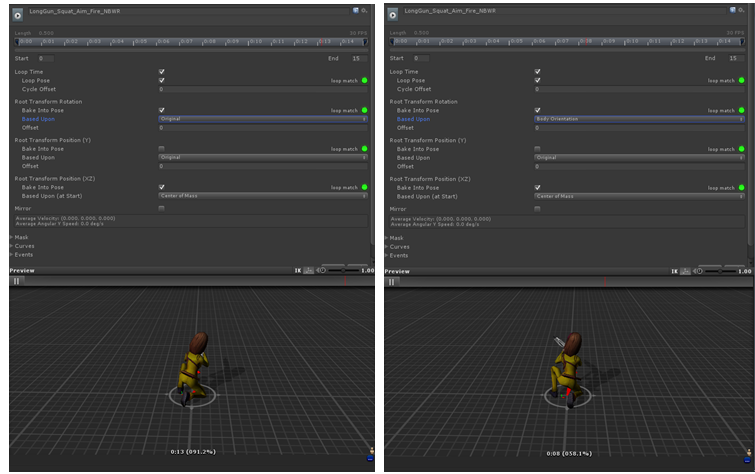
Original的提示是:Keep the rotation as it is authored in the source file
Body Oritation的提示是:Keeps the upper body pointing forward

6.4 不要把Unity3D工程A中的中的fbx文件拷贝供其它工程使用

这样做在另一个工程中会出现很多意想不到的现象,别的工程要用的话,必须使用源fbx文件。

6.5 Mask,Curves, Events

具体哪个版本的Unity3D为导入的动作加入了这几个东西,已经记不得了。

6.5.1 Mask

6.5.2 Curves

Curves和Events都是一个动作上可以添加多个的。
Curves通过添加曲线来控制动画各个部位的播放速度。
一个动作添加了多个Curve的话,会取均值??
如下图添加了一个叫做RollCurve的Curve,若动作的Animator Controller也声明了float型的“RollCurve”动作,则这个两个便挂钩了。在程序中可以获得当前Curve的值
add curves
Debug.Log(“rollCurveValue is:”+animator.GetFloat(“RollCurve”));
详见:http://docs.unity3d.com/Documentation/Manual/AnimatorCurves.html/

6.5.3 Events

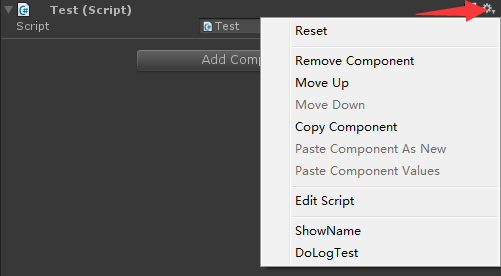
可以为动作添加事件,当动作运行到添加事件的时间点后,会触发事件的执行,同样一个动作上可以添加多个事件,满足条件的时候都会执行的。
add many events
下图为添加事件的窗口。Function后的textbox对应动作控制脚本上的函数名称,该函数对public还是private没有要求,但是该函数只能带0个或者1个参数,参数类型如下图。
Add events

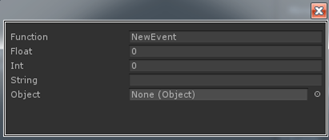
6.6 Any State->Death需要注意的事项

默认从Any State到其它状态添加了动作转换过渡后,默认条件如下图:
any state 2 death
但是该条件一运行便会执行。于是我们想通过某个bool变量如isDeath来控制,于是删除Exit Time这个条件,只使用bool变量来控制。结果是动作会来回一直闪烁,非常奇怪。解决方案是保留该Exit Time条件,根据需要 调节后面的时间,然后结合bool变量来控制

6.7 移除动作模型保留动作文件,无法减少占用空间

由于要在unity3d中调相关的参数,一般从3dsmax中导出的fbx都是带有模型的动作。在unity3d中做好一切工作后,想着可以ctrl+d把动作文件从模型中复制出来(选中动作文件,ctrl+d会自动复制一个到project目录中),然后删除原来的模型,达到减少安装包大小的目地。事实上测试了,无法。Unity其实已经做了相关的优化的,打包的时候打入的就是动作文件, 而不是包括冗余的模型。
需要注意的是,再修改相关参数的话就没法了…需要重新导入模型文件…
另一方面,6.5中提到的设置的events事件在模型文件被删除后依旧会保留的,只是我们看不到了,无法编辑了而已!~~

6.8 SetBool和SetTrigger函数比较,以及bool变量和trigger变量比较

Unity4.3在animator面板内引入了Trigger这个变量(以前只有int ,float,bool三种)

6.8.1 SetBool,SetTrigger函数

在animator界面要是需要用一个bool变量(这里以bool IsAttack为例)来控制动画的来回切换就要先设置IsAttack为true,然后在适当的时候设置为false。
如何获取适当的时候呢?一般都是通过animator.GetCurrentAnimatorStateInfo来获取当前的动画播放信息。
SetBool比较简单,代码如下:

stateInfo0 = animator.GetCurrentAnimatorStateInfo(0);
if(stateInfo0.IsName("Base Layer.Attack"))
{
    if(stateInfo0.normalizedTime>0.9f)
    {
        animator.SetBool("IsAttack",false);
    }
}
if(Input.GetKeyDown(KeyCode.A))
{
    animator.SetBool("IsAttack",true);
}

SetTrigger代码如下(这里用SetTrigger来操纵animator界面中声明为bool类型的变量,发现竟然可以操纵):

stateInfo0 = animator.GetCurrentAnimatorStateInfo(0);
if(stateInfo0.IsName("Base Layer.Attack"))
{
    if(stateInfo0.normalizedTime>0.9f)
    {
        animator.SetBool("IsAttack",false);
    }
}
if(Input.GetKeyDown(KeyCode.A))
{
    animator.SetTrigger("IsAttack");
}

SetTrigger实质其实就是设置了IsAttack为true了。但事实上SetTrigger函数是用来操纵Trigger类型变量的。如下介绍

6.8.2 Bool变量,Trigger变量

http://answers.unity3d.com/questions/600268/mecanim-animation-parameter-types-boolean-vs-trigg.html/
这里有讨论。
下图为使用Trigger变量作为条件的截图,它不像Bool变量那样有true,false之分。
trigger inspector
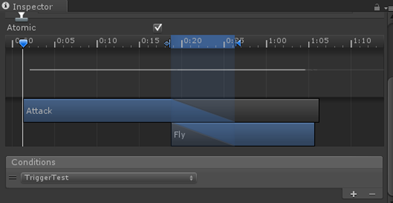
通过使用SetTrigger函数,可以先设置Tigger变量的值为true,使得进入另一个状态,然后立马Tigger变量又变为false。这样就不用像SetBool函数那边,还要考虑在合适的时候设置为false的问题。
比如人物从Idle状态到攻击状态,通过Tigger类型变量isAttack来控制。
从Idle到攻击,用isAttack来控制。这样我们进入攻击后,该变量又回到false。
攻击再回到Idle,用ExistTime来控制。这样就比较好的解决了问题。

Unity3D bug积累

1:mp3没有声音
如图:导入到场景中的mp3格式的音乐在预览界面点击播放,听不到声音。但是用外部播放器打开对应文件夹下的该文件却有声音的。
把文件删除、重新导入,依旧没有声音。
最后重启Unity3D,尼玛,可以了。。。这个BUG,3年前就存在了。。

2:图片导入后Could not create texture from XXXX;File could not be read.
无论是直接复制粘贴到unity3d文件夹内还是用import都报错如下。图片是白色的,不显示内容。
图片显示白色
解决方法:用photoshop打开,重新保存一道。可能是编码的问题吧~~~

2:Build Problem - asset is marked as don’t save
20140512(汶川六年)
今天做电影学院3D互动项目,切换为成android平台后,build and run的时候报了一些列错。如下图:
Error 1:
An asset is marked as dont save, but is included in the build:
UnityEditor.HostView:OnGUI()
Error 2:
Building - Failed to write file: sharedassets0.assets UnityEditor.HostView:OnGUI()
Error 3:
Error building Player: Couldn’t build player because of unsupported data on target platform.

这是论坛上对该问题的讨论:http://answers.unity3d.com/answers/706282/view.html
我关闭unity后,重新打开。问题消失

3:Profiler LogStringToConsole
Necromancy项目,主角死亡后,复活后帧率极度下降,打开profiler
profiler示图

发现FriendAnimationControl.cs脚本中的debug占用了几乎全部的内存消耗。
问题是FriendAnimationControl.cs上的脚本已经完全注释了Debug.Log以及Printf了。
最终终于找到原因:http://forum.unity3d.com/threads/profiler-showing-logstringtoconsole-what-is-that.237589/#post-1577507

解释

打开Editor Log
如上图,在Console面板点击Open Editor Log
在详细的Editor Log中发现了很多句如下信息:
!(Log信息)[/img/LogClear.png]
这些信息,被当作垃圾debug信息,没有显示在Console的面板中,只能通过Log日志看到。
于是追本溯源,在FriendAnimationControl.cs脚本中发现在主角死亡的时候设置了animator.runtimeAnimatorController = null;
导致主角复活后,友军继续执行animator.SetBool之类的操作,报错Animator has not been initialized。可惜的是该报错被当作垃圾信息了……

4: Shader wants normals, but the mesh XXX doesn’t have them的警告

shader wants normals

找到名为XXX的mesh,发现其用的shader 是diffuse,根本不需要法线贴图。
再仔细看看,这个XXX mesh是用代码生成的。于是最后调用了RecalculateNormals()方法,顺利解决。(_trailMesh.RecalculateNormals());

5:Setting the parent of a transform which resides in a prefab is disabled to prevent data corruption
出现情况描述:Resource.Load了一个Prefab,并as强制转换为GameObject类型bb。然后设置bb的父物体为场景中已知的物体。报错如上。
解决方法:还必须Instantiate一下bb,并存到cc中,然后就可以随便操纵cc了,不会发生上述报错:
GameObject bb=Resources.Load(XXX) as GameObject;
GameObject cc=Instantiate(bb);

Unity3D Navmesh杂记

1:navmesh agent和character controller

当使用navmesh要实现物体不和其余collider碰撞需要为物体添加collider组件。
但是添加了collider后,会发现相机抖动厉害。
经测试是navmesh agent和character controller之间的冲突,但是程序需要又不能删除某一个,故考虑动态关闭一个即可。
故程序中根据情况,对navmesh agent进行enable的开关

2:判断是否到达目标点destination

当设置了navMeshAgent.destination后,如何判断是否到达目标点,由于api中没提供直接的接口
经过测试实时获得当前物体和目标的距离来进行判断:
Vector3.Distance(transform.position, navMeshAgent.destination) < 0.5f
PS:api中提供有remainingDistance接口用来获得距离目标点还有多远的距离。但是该接口在刚设置destination后获得的距离也是0。因此基本不可取
PS2:也可以用: navMeshAgent.path.corners.Length == 1,但是有时候会失效。法科

Unity3D优化总结

  1. 不要使用OnGUI(),它很慢,非常慢。
  2. 当需要频繁修改物体的localScale时,移除其collider组件,否则会非常影响帧率。
  3. 使用OnBecameVisible()/OnBecameInvisible()配对使用修改enabled属性,使得只有在对象可见时脚本才会执行。
    (物体不可见的时候drawcall是降低了,但是若自身带有脚本,还是执行的~~~)
  4. 使用InvokeRepeating()代替Update()处理不需要实时的数据更新。
  5. 使用对象池GameObjectPool缓存频繁使用的对象。

IOS平台优化建议
• Keep vertex count below:
• 40K per frame when targeting iPhone 3GS and newer devices (with SGX GPU)
• 10K per frame when targeting older devices (with MBX GPU)
• Keep the number of different materials per scene low - share as many materials between different objects as possible.
• Set Static property on a non-moving objects to allow internal optimizations.
• Use PVRTC formats for textures when possible, otherwise choose 16bit textures over 32bit.
• Use combiners or pixel shaders to mix several textures per fragment instead of multi-pass approach.
• If writing custom shaders, always use smallest possible floating-point types:
• fixed / lowp – perfect for color, lighting information and normals,
• half / mediump – for texture UV coordinates,
• float / highp – avoid in pixel shaders, fine to use in vertex shader for vertex position calculations.
• Minimize use of complex mathematical operations such as pow, sin, cos etc in pixel shaders.
• Do not use Pixel Lights when it is not necessary – choose to have only a single (preferably directional) pixel light affecting your geometry.
• Do not use dynamic lights when it is not necessary – choose baking lighting instead.
• Choose to use less textures per fragment.
• Avoid alpha-testing, choose alpha-blending instead.
• Do not use fog when it is not necessary.
• Learn benefits of Occlusion culling and use it to reduce amount of visible geometry and draw-calls in case of complex static scenes with lots of occlusion. Plan your levels to benefit from Occlusion culling.
• Use skyboxes to “fake” distant geometry.
更多优化相关的知识:官网
http://docs.unity3d.com/Documentation/Manual/OptimizingGraphicsPerformance.html

Modeling Characters for Optimal Performance

Below are some tips for designing character models to give optimal rendering speed.

Use a Single Skinned Mesh Renderer

You should use only a single skinned mesh renderer for each character. Unity optimizes animation using visibility culling and bounding volume updates and these optimizations are only activated if you use one animation component and one skinned mesh renderer in conjunction. The rendering time for a model could roughly double as a result of using two skinned meshes in place of a single mesh and there is seldom any practical advantage in using multiple meshes.

Use as Few Materials as Possible

You should also keep the number of materials on each mesh as low as possible. The only reason why you might want to have more than one material on a character is that you need to use different shaders for different parts (eg, a special shader for the eyes). However, two or three materials per character should be sufficient in almost all cases.

Use as Few Bones as Possible

A bone hierarchy in a typical desktop game uses somewhere between fifteen and sixty bones. The fewer bones you use, the better the performance will be. You can achieve very good quality on desktop platforms and fairly good quality on mobile platforms with about thirty bones. Ideally, keep the number below thirty for mobile devices and don’t go too far above thirty for desktop games.

Polygon Count

The number of polygons you should use depends on the quality you require and the platform you are targeting. For mobile devices, somewhere between 300 and 1500 polygons per mesh will give good results, whereas for desktop platforms the ideal range is about 1500 to 4000. You may need to reduce the polygon count per mesh if the game can have lots of characters onscreen at any given time. As an example, Half Life 2 used 2500-5000 triangles per character. Current AAA games running on the PS3 or Xbox 360 usually have characters with 5000-7000 triangles.

Keep Forward and Inverse Kinematics Separate

When animations are imported, a model’s inverse kinematic (IK) nodes are baked into forward kinematics (FK) and as a result, Unity doesn’t need the IK nodes at all. However, if they are left in the model then they will have a CPU overhead even though they don’t affect the animation. You can delete the redundant IK nodes in Unity or in the modeling tool, according to your preference. Ideally, you should keep separate IK and FK hierarchies during modeling to make it easier to remove the IK nodes when necessary.

Simple Checklist to make Your Game Faster

• Keep vertex count below 200K..3M per frame when targetting PCs, depending on the target GPU
• If you’re using built-in shaders, pick ones from Mobile or Unlit category. They work on non-mobile platforms as well; but are simplified and approximated versions of the more complex shaders.
• Keep the number of different materials per scene low - share as many materials between different objects as possible.
• Set Static property on a non-moving objects to allow internal optimizations like static batching.
• Do not use Pixel Lights when it is not necessary - choose to have only a single (preferably directional) pixel light affecting your geometry.
• Do not use dynamic lights when it is not necessary - choose to bake lighting instead.
• Use compressed texture formats when possible, otherwise prefer 16bit textures over 32bit.
• Do not use fog when it is not necessary.
• Learn benefits of Occlusion Culling and use it to reduce amount of visible geometry and draw-calls in case of complex static scenes with lots of occlusion. Plan your levels to benefit from ccclusion culling.
• Use skyboxes to “fake” distant geometry.
• Use pixel shaders or texture combiners to mix several textures instead of a multi-pass approach.
• If writing custom shaders, always use smallest possible floating point format:
o fixed / lowp - for colors, lighting information and normals,
o half / mediump - for texture UV coordinates,
o float / highp - avoid in pixel shaders, fine to use in vertex shader for position calculations.
• Minimize use of complex mathematical operations such as pow, sin, cos etc. in pixel shaders.
• Choose to use less textures per fragment.

Unity3D相关的各种文件目录

1:dll目录

1.1 mono dll

?:\Program Files (x86)\Unity安装目录名\Editor\Data\Mono\lib\mono\2.0

1.2 其它dll,如sqlite3.dll

?:\Program Files (x86)\Unity安装目录名\Editor

2:asset store下载默认目录

Win PC: C:\Users\用户名\AppData\Roaming\Unity\Asset Store

3:persistentDataPath目录

这是一个和Company Name、Product Name都相关的目录。
Win pc上:C:\Users\用户名\AppData\LocalLow\CompanyName\ProductName
运行软件后会建立以上目录,即persistentDataPath的目录,相同的CompanyName的产品都放在一起,通过二级目录ProductName来唯一区分产品
Android上:(要分内存和存储卡)基本位置都是Android/data/www.公司名.产品名/files

4:脚本模版所在目录

Mac: /Applications/Unity/Unity.app/Contents/Resources/ScriptTemplates
Win:[Unity install path] /Editor/Data/Resources/ScriptTemplates/
可以通过设置脚本模版的样式控制新建脚本的样式。
同样把脚本模版的编码方式设置为utf-8,可以解决不支持中文的问题。

5:自带package目录

5.0之前才自带package
?:\Program Files (x86)\目录名\Editor\Standard Packages

Unity3D和3DSMax的种种

1:坐标系的统一

Unity3D使用左手坐标系,Max是右手坐标系。
Max中模型导出fbx后导入Unity中后,X轴的旋转会变成-90°。因此需要在导出前把Max中模型的Y轴旋转向上,即旋转X轴90°。
方法:3DSMax中切换顶视图,此时默认坐标轴为:X轴向右,Y轴向上,Z轴指向自己。需要改成:X轴向右,Y轴指向自己,Z轴向下。这样导出的fbx在Unity中便是正常的了。

!(3DSMax模型导出fbx注意事项)[/img/3dsmax fbx 2 unity3d.png]
特别注意第2点,要修改为Local局部坐标。

Unity3D插件之刀光

1:wiki上的开源脚本,原理:动态mesh

来源:http://wiki.unity3d.com/index.php?title=MeleeWeaponTrail

该刀光脚本由三部分组成:
最根本的刀光动态mesh脚本MeleeWeaponTrail.cs;刀光显示与否的控制脚本;以及刀光平滑插值脚本Interpolate.cs(http://wiki.unity3d.com/index.php/Interpolate)。其中插值脚本不是必须的。
使用方法:把MeleeWeaponTrail.cs脚本附加到3D模型武器所在的骨骼点上,同时为该骨骼点增加两个空的子物体,一个用来指示刀光的顶部位置,一个用来指示刀光的底部位置。脚本中取消“#define USE_INTERPOLATION”的注释,可以平滑刀光,但是记得到要在工程中添加Interpolate.cs脚本。
把脚本MeleeWeaponTrail.cs拖到骨骼点上,Inspector界面为

"刀光插件inspector视图"

Emit表示是否发出刀光,若是想通过代码控制,一般都取消Emit的勾选

EmitTime表示刀光发出后多久就停止发出刀光,0表示无限大,一般默认该值

Material为刀光使用的材质球。。。。注意材质球使用Particles/Additive的shader

LifeTime表示刀光面片存在的时间,单位s

Colors:淡出颜色,(通过设置Colors的alpha可以很好控制刀光的透明度,一般设置alpha为50效果还不错,另外通过设置Colors可以设置刀光的颜色,而不必再做一个带颜色的刀光了)

Sizes:设置刀光不同部位的大小

Min Vertex Distance: Never make segments shorter than this

Max Vertex Distance: Never make segments longer than this

Max Angle: Never make angles between segments greater than this. Increasing it will make a faster but uglier line.

Auto Destruct: Destroy this object and the render object if we are not emitting and have no segments left .

Base,Tip就是上面提到的刀光的底部和顶端位置

然后我们在刀光的控制脚本通过设置MeleeWeaponTrail.cs的Emit参数true/false来控制刀的开关。如下代码:

public class MeleeWeaponTrailControl : MonoBehaviour
{
    [SerializeField]
    MeleeWeaponTrail _trail;
    Animator animator;
    AnimatorStateInfo stateInfo0;
    void Start()
    {
        animator = GetComponent<Animator>();
        _trail.Emit = false;
    }
    void Update()
    {
        stateInfo0 = animator.GetCurrentAnimatorStateInfo(0);
        if (stateInfo0.IsName("Base Layer.Melee1")
            || stateInfo0.IsName("Base Layer.Melee2")
            || stateInfo0.IsName("Base Layer.Melee3")
            || stateInfo0.IsName("Base Layer.Melee4")
            || stateInfo0.IsName("Base Layer.Melee5"))
        {
            if (stateInfo0.normalizedTime > 0.1 && stateInfo0.normalizedTime < 0.8)
            {
                _trail.Emit = true;
            }
            else
            {
                _trail.Emit = false;
            }
        }
    }
}    

以上涉及到的脚本已经存到百度网盘:http://pan.baidu.com/s/1pJWqSP1

https://www.assetstore.unity3d.com/en/#!/content/1728这是Unity3D assetstore上的基于上述的工程。http://pan.baidu.com/s/1gel03AV这是该工程的网盘链接

Unity3D音频视频相关

音频视频
unity3d支持的音频文件格式:.aif, .wav, .mp3, 和 .ogg

视频格式:支持.mov, .mpg, .mpeg, .mp4, .avi, .asf,.ogg,.ogv格式

Ogg格式转换
1 在线工具:
http://www.online-convert.com/
2 TheoraConverter:
老软件了,好几年没有更新了。
http://sourceforge.net/projects/theoraconverter/ 可以下载到1.1版本的,貌似没有格式选择,测试了一下转换后为ogv格式的。
http://theora-converter-net.software.informer.com/download/ 这里提供的有2.6版本的,但是下载不下
2.6版本的多了格式选择,其它的没有详细比较。。。

我的网盘提供了1.1,2.6两个版本的 http://pan.baidu.com/s/1pJDHSuv
Theora Converter
如图为2.6的截图,第二个选项卡“Video”里面EncodingMode默认就是Bitrate 1000
若用默认值,转出来的视频马赛克严重,故该值越大越好,范围为后面小括号内的值。
另外也可以选择Quality,默认值是6,测试结果还可以。这个值越大越清晰,当然视频的大小也会大一些。。。
3: iDealshare VideoGo
这个没有测试,!!!蛋疼
http://www.idealshare.net/video-converter/ogv-converter-for-mac-windows.html

4:vcl视频播放软件和miro Video Conterter软件
http://www.videolan.org/
http://www.mirovideoconverter.com/
经过测试vcl和miro converter转换后的ogg(ogv)分辨率不行而且丢帧严重

Unity3D中的小知识点杂记

1:方法

1.1 Quaternion.Euler

欧拉角旋转,按照Z,X,Y的顺序旋转

1.2 Quaternion.Angle

static float Angle(Quaternion a, Quaternion b);
获得两个四元数之间的夹角,结果是两个z轴之间的夹角

1.3 Quaternion.AngleAxis

static Quaternion AngleAxis(float angle, Vector3 axis);
经过测试,为某个物体设置围绕具体axis旋转的角度后,其余轴的旋转值会被设置为0.即使物体原始状态下其余轴的旋转值不为0.
angle可以设置为任意值,为负值时,表现在inspector面板上的物体旋转角度会被换算为正值(如-5会被换算为355)。若angle超过+-360°,也会被换算为[0,360)

1.4 Object.FindObjectsOfType

static Object[] FindObjectsOfType(Type type);
Returns a list of all active loaded objects of Type type.
//这个函数是递归的,可以获得子物体。获得的是整个场景中某种类型的物体,若物体上有某个脚本(如abc.cs),通过GameObject.FindObjectsOfType(typeof(abc)) 也可以获得到改物体

1.5 获得当前场景名称

编辑器模式下:Path.GetFileName(EditorApplication.currentScene)
EditorApplication.currentScene获得的是诸如Assets/XXX/XXX.unity这种路径。使用Path.GetFileName获得名称和后缀.unity
运行模式下:Application.loadedLevelName获得的只是场景名称,无后缀

1.6 获得机器唯一标识符

SystemInfo.deviceUniqueIdentifier
这个对于ios设备,ios7之前获取的才是唯一的,具体参见文档。
SystemInfo可以获得很多关于设备的参数信息。

3:清空console面板的输出

以下代码对4.3.4有效
public static void ClearLog()
{
var assembly = Assembly.GetAssembly(typeof(UnityEditor.ActiveEditorTracker));//注意Assembly需要使用using System.Reflection
var type = assembly.GetType(“UnityEditorInternal.LogEntries”);
var method = type.GetMethod(“Clear”);
method.Invoke(new object(), null);
}
适用于运行时、适用于Editor
http://answers.unity3d.com/questions/10580/editor-script-how-to-clear-the-console-output-wind.html

平台依赖编译

https://docs.unity3d.com/Documentation/Manual/PlatformDependentCompilation.html
结合#if #elif #else #endif及||使用
运行时平台
RuntimePlatform
if (Application.platform == RuntimePlatform.WindowsEditor || Application.platform == RuntimePlatform.WindowsPlayer)

Rich Text

Unity Manual->Advanced 支持对GUI中的字体和Debug中的字符,支持的tag有

通过代码执行菜单项

EditorApplication.ExecuteMenuItem(“GameObject/Create Other/Cube”)

Color

程序中Color范围为[0,1]

碰撞设置:

1,通过Edit->ProjectSettings->Physics
来设置全局的碰撞矩阵。
代码中也可以使用Physics.IgnoreLayerCollision来设置具体两个layer之间的碰撞关系。
static void IgnoreLayerCollision(int layer1, int layer2, bool ignore = true);
如:
Physics.IgnoreLayerCollision(9, 12, true);
这里的int型的layer1,layer2对应的就是Layer的Index,不需要进行位运算

忽略两个collider之间的碰撞,可以使用方法Physics.IgnoreCollision()

Editor模式下,运行,Update堵塞

void Update()
{
    Debug.Log(Time.time);
}

打印结果:
"Update打印结果"

这也是为什么在编辑器模式下写诸如transform.translate之类的移动函数的时候,一开始会出现跳跃的原因了。

解决方法,默认obj为不可见,程序中通过设置obj的Active为true,可以解决。
另外可以使用FixedUpdate

Awake执行还是不执行?

脚本附着到gameobject上。
当脚本的enable为false,gameobject active为true,运行游戏后,脚本的awake函数依旧执行。
当脚本的enable为true,gameobject active为false,运行游戏后,脚本的awake函数不执行。

Unity3D中的属性标识

1. 类级别标识

1.1 AddComponentMenu 添加组件菜单

默认的脚本都会出现在”Component->Script”菜单下,在类之前通过AddComponentMenu标识可以设定脚本出现在Component下的其它目录。注意该标识生效需要重启Unity3D。
eg:

[AddComponentMenu("MyTest/Test")]
public class Test : MonoBehaviour
{
} 

1.2 ExecuteInEditMode Editor模式下运行

Editor模式下运行三种函数调用的方式如下:
Update() 当Scene视图有改变的时候被调用
OnGUI() 当Game视图收到一个事件的时候被调用
OnRenderObject() Scene或者Game视图重绘时被调用

1.3 RequireComponent 脚本的运行依赖某组件的存在

1.4 Serializable 可序列化

该标识可以使得类(结构)级别的变量显示在检视面板,也能序列化它。
(注意对于JS,不需要该标识,默认类级别的变量是可以序列化的)
(注意要引用命名空间System)

1.5 CustomEditor 自定义某个组件的检视面板样式

格式:[CustomEditor(typeof(XXXX))],详见“Unity3D编辑器扩展”一文。

2. 方法级标识

2.1 ContextMenu 上下文菜单

这是一个方法级的标识,可以为Inspector脚本中添加一个触发事件,示例代码和截图如下所示。 注意ContextMenu不支持多重路径。

[AddComponentMenu("MyTest/Test")]
public class Test : MonoBehaviour
{
    [ContextMenu("DoLogTest")]
    void DoLogTest()
    {
        Debug.Log("i am function DoLogTest");
    }
    [ContextMenu("ShowName")]
    void ShowName()
    {
        Debug.Log(gameObject.name);
    }
} 

上下文菜单使用示例

2.2 MenuItem 编辑器扩展添加菜单的目录

详见“Unity3D编辑器扩展”一文,需要引用Unity.Editor命名空间,类需要放到Editor目录下。

3. 变量级标识

3.1 HideInInspector Inspector界面隐藏变量的显示

注意变量仍可以被序列化,只是不在Inspector界面显示而已。

3.2 NonSerialized 不被序列化

不序列化变量,且不显示在检视面板中。(注意要引用命名空间System)

3.3 SerializeField 私有变量序列化

该标识可以将私有变量(所有继承自UnityEngine.Object的类,如GameObject,Component,MonoBehaviour,Texture2D,AnimationClip;所有基本类型,如int,string,float,bool;一些内建类型,如Vector2,Vector3,Quaternion,Color,Rect,Layermask;序列化类型的Array,序列化类型的List;枚举Enum)序列化,使得在检视面板内可以重新设置变量的值,虽然检视面板可见,但仍然是私有变量。
注意该标识不可以序列化静态变量,也不能序列化属性。

3.4 ContextMenuItem

可以为变量(public)添加右键弹出命令,从而执行相关的操作。
该标识接受两个变量,1个是display name,一个是右键弹出菜单点击后的方法。
如下述代码和截图所示:

public class Test : MonoBehaviour
{
    [ContextMenuItem("Random Age", "RandomAge")]
    public int Age;
    void RandomAge()
    {
        Age = new System.Random(DateTime.Now.Millisecond).Next(1, 100);
    }

    [ContextMenuItem("Random Name", "RandomName")]
    public string Name;
    private void RandomName()
    {
        string[] names = new string[] { "Jack", "Jim", "Tomas", "Han", "Ann" };
        Name = names[new System.Random(DateTime.Now.Millisecond).Next(0, 4)];
    }
}

ContextMenuItem标识实现的效果

3.5 Range/RangeAttribute 变量范围限定

[Range(min,max)]或者[RangeAttribute(min,max)]可以对变量的输入范围进行限定,使得Inspector检视面板内的数值输入框变成Slider,且范围为(min,max)。