// MIT license - TL;DR - Do whatever you want with it, I'm not liable for what you do with it!
#define FAIL_FAST
using UnityEngine;
using System.Collections;
using System.Collections.Generic;

/// <summary>
/// <para>Used for memory recycling of reference types, like GameObjects</para>
/// <para>Example usage:</para>
/// <para>MemoryPool<GameObject> memPool = new MemoryPool<GameObject>(); // construction</para>
/// <para>memPool.Setup(
///        ()    => Instantiate(prefab),
///        (obj) => { obj.SetActive(true);  },
///        (obj) => { obj.SetActive(false); },
///        (obj) => { Object.Destroy(obj);  }
/// );</para>
/// <para>GameObject gobj = memPool.Alloc();  // allocate object in pool</para>
/// <para>memPool.Free(gobj); // deallocate object in pool</para>
/// <para>MemoryPoolItem.Destroy(gobj); // deallocate object in pool OR Object.Destroy non-MemoryPool object (for GameObjects only)</para>
/// </summary>
public class MemoryPool<T> where T : class
{
private List<T> allObjects = null;
private int freeObjectCount = 0;

public delegate T DelegateBeginLife();
public delegate void DelegateCommission(T obj);
public delegate void DelegateDecommission(T obj);
public delegate void DelegateEndLife(T obj);

public DelegateBeginLife birth;
public DelegateEndLife death;
public DelegateCommission commission;
public DelegateDecommission decommission;

/// <summary>
/// Example usage:
/// <para>memPool.Setup(
///        ()    => Instantiate(prefab),
///        (obj) => obj.SetActive(true),
///        (obj) => obj.SetActive(false),
///        (obj) => Object.Destroy(obj)
/// );</para>
/// </summary>
/// <param name="create">callback function or delegate used to create a new object of type T</param>
/// <param name="activate">callback function or delegate used to activate an object of type T</param>
/// <param name="deactivate">callback function or delegate used to de-activate an object of type T</param>
/// <param name="destroy">callback function or delegate used to destroy an object of type T</param>
public void Setup(DelegateBeginLife create, DelegateCommission activate, DelegateDecommission deactivate, DelegateEndLife destroy)
{
    birth = create; commission = activate; decommission = deactivate; death = destroy;
}

/// <summary>Constructs and calls <see cref="Setup"/></summary>
public MemoryPool(DelegateBeginLife create, DelegateCommission activate, DelegateDecommission deactivate, DelegateEndLife destroy)
{
    Setup(create, activate, deactivate, destroy);
}

/// <summary> Be sure to call <see cref="Setup"/>!</summary>
public MemoryPool() { }

/// <summary>Returns an object from the memory pool, which may have just been created</summary>
public T Alloc()
{
    T freeObject = null;
    if (freeObjectCount == 0)
    {
        #if FAIL_FAST
        if (birth == null) { throw new System.Exception("Call .Setup(), and provide a create method!"); }
        #endif
        if (allObjects == null) { allObjects = new List<T>(); }
        freeObject = birth();
        allObjects.Add(freeObject);
        if (typeof(T) == typeof(GameObject))
        {
            GameObject go = freeObject as GameObject;
            go.AddComponent<MemoryPoolItem>().SetPool(this as MemoryPool<GameObject>);
        }
    }
    else
    {
        freeObject = allObjects[allObjects.Count - freeObjectCount];
        freeObjectCount--;
    }
    if (commission != null) { commission(freeObject); }
    return freeObject;
}

/// <summary>Which object to mark as free in the memory pool</summary>
public void Free(T obj)
{
    int indexOfObject = allObjects.IndexOf(obj);
    #if FAIL_FAST
    if (indexOfObject < 0) { throw new System.Exception("woah, this isn't one of mine..."); }
    if (indexOfObject >= (allObjects.Count - freeObjectCount)) { throw new System.Exception("hey, you're freeing this twice..."); }
    #endif
    freeObjectCount++;
    int beginningOfFreeList = allObjects.Count - freeObjectCount;
    allObjects[indexOfObject] = allObjects[beginningOfFreeList];
    allObjects[beginningOfFreeList] = obj;
    if (decommission != null) { decommission(obj); }
}

/// <summary>performs the given delegate on each object in the memory pool</summary>
public void ForEach(DelegateCommission action)
{
    for (int i = 0; i < allObjects.Count; ++i) { action(allObjects[i]); }
}

/// <summary>Destroys all objects in the pool, after deactivating each one.</summary>
public void DeallocateAll()
{
    ForEach((item) => decommission(item));
    if (typeof(T) == typeof(GameObject))
    {
        ForEach((item) =>
        {
            GameObject go = item as GameObject;
            Object.DestroyImmediate(go.GetComponent<MemoryPoolItem>());
        });
    }
    if (death != null) { ForEach((item) => death(item)); }
    allObjects.Clear();
}
}

public class MemoryPoolItem : MonoBehaviour
{
private MemoryPool<GameObject> gameObjectPool;
public MemoryPoolItem SetPool(MemoryPool<GameObject> pool) { gameObjectPool = pool; return this; }
static private bool shuttingDown = false;
static public void SetShutdown(bool sceneIsEnding) { shuttingDown = sceneIsEnding; }
#if FAIL_FAST
void OnApplicationQuit() { SetShutdown(true); }
void Start() { SetShutdown(false); }
void OnDestroy()
{
    if (!shuttingDown) throw new System.Exception("Instead of Object.Destroy(" + gameObject + "), call MemoryPoolItem.Destroy(" + gameObject + ")\n"+ "When changing levels, call MemoryPoolItem.SetShutdown(true) first");
}
#endif
public void FreeSelf() { gameObjectPool.Free(gameObject); }
/// <summary>If the given GameObject belongs to a memory pool, mark it as free in that pool. Otherwise, Object.Destroy()</summary>
static public void Destroy(GameObject go)
{
    MemoryPoolItem i = go.GetComponent<MemoryPoolItem>();
    if (i != null) { i.FreeSelf(); }
    else { Object.Destroy(go); }
}
}
bbbbbbion
程序员也有一个艺术家梦。
Unity3D中的一些技巧总结
以下tip来源于网络(unity wiki、unity fb、unity Twitter等)
1:
When you’re using Debug.Log or related methods, provide the instance of the script so you can click the log output and have the relevant object selected in editor! Debug.Log(“Test”, this);
2:
To remember which color means what on an axis in Unity, just remember the mnemonic: RGB = XYZ.
3:Draw editor gui’s only in active scene view
If you are creating custom editors for unity but only want the gui for that editor to be drawn in the currently active scene view try this …
if (SceneView.mouseOverWindow.GetInstanceID() == SceneView.currentDrawingSceneView.GetInstanceID())
{
    this.DrawGUI(SceneView.currentDrawingSceneView);
}
4:Execute menu items from editor script
If you want to take advantage of functionality that is provided by menu commands you can useEditorApplication.ExecuteMenuItem in your editor scripts to execute them.
5:Screen Resolution
If you need to set the screen resolution of your game via scripting check out Screen.SetResolution.
6:Collider manipulation
Did you know that you can manipulate a game objects collider in the scene view by holding down the ‘Shift’ key. Holding shift will display the colliders control dots. Just drag the dots to adjust the collider!
7:Running Editor Script Code on Launch
If you need to run some script code as soon as the editor has launched you can use the InitializeOnLoad attribute.
8:各平台下的log文件
http://docs.unity3d.com/Manual/LogFiles.html
9:unity的命令行参数
http://docs.unity3d.com/Manual/CommandLineArguments.html
11:Can you hear me now?
Unity provides access to the users microphone via the Microphone class.
http://docs.unity3d.com/ScriptReference/Microphone.html
12:Location awareness
Unity provides support for location awareness such as longitude, latitude, and altitude in the LocationService class.
http://docs.unity3d.com/ScriptReference/LocationService.html
13:Social Platforms
Unity provides built in support for various social platforms including support for custom implementations through the Social class.
http://docs.unity3d.com/ScriptReference/Social.html
14:Gyroscopes
If the device supports it you can use the Gyroscope class to get gyroscopic information about the orientation and acceleration of the device.
http://docs.unity3d.com/ScriptReference/Gyroscope.html
15:EditorApplication
http://docs.unity3d.com/ScriptReference/EditorApplication.html
场景的保存、新建、暂停等等用script模拟Editor相关操作
16:MeshUtility.Optimize
程序生成的mesh可以用这个做优化
http://docs.unity3d.com/ScriptReference/MeshUtility.Optimize.html
17:UI渐变效果
using UnityEngine;
using System.Collections;
using System.Collections.Generic;
using UnityEngine.UI;

[AddComponentMenu("UI/Effects/Gradient")]
public class Gradient : BaseVertexEffect {
[SerializeField]
private Color32 topColor = Color.white;
[SerializeField]
private Color32 bottomColor = Color.black;

public override void ModifyVertices(List<UIVertex> vertexList) {
    if (!IsActive()) {
        return;
    }

    int count = vertexList.Count;
    float bottomY = vertexList[0].position.y;
    float topY = vertexList[0].position.y;

    for (int i = 1; i < count; i++) {
        float y = vertexList[i].position.y;
        if (y > topY) {
            topY = y;
        }
        else if (y < bottomY) {
            bottomY = y;
        }
    }

    float uiElementHeight = topY - bottomY;

    for (int i = 0; i < count; i++) {
        UIVertex uiVertex = vertexList[i];
        uiVertex.color = Color32.Lerp(bottomColor, topColor, (uiVertex.position.y - bottomY) / uiElementHeight);
        vertexList[i] = uiVertex;
    }
}
}
18:AABB碰撞检测
using UnityEngine;
using System.Collections;

public static class Aabb

{

public static bool Colliding( GameObject a, GameObject b )
{
    Rect aBox = a.BoxToRect();
    Rect bBox = b.BoxToRect();

    // Find out if these guys intersect
    return Intersect ( aBox, bBox );
}

// This checks the intersection between two rectangles.
public static bool Intersect( Rect a, Rect b )
{
    // Basic AABB collision detection. All of these must be true for there to be a collision.
    bool comp1 = a.yMin > b.yMax;
    bool comp2 = a.yMax < b.yMin;
    bool comp3 = a.xMin < b.xMax;
    bool comp4 = a.xMax > b.xMin;

    // This will only return true if all are true.
    return comp1 && comp2 && comp3 && comp4;
}

// This converts a BoxCollider2D to a rectangle for use in determining an intersection
private static Rect BoxToRect ( this GameObject a )
{
    // Finding the BoxCollider2D for the GameObject.
    BoxCollider2D aCollider = a.GetComponent<BoxCollider2D> ();

    // Grabbing the GameObject position, converting it to Vector2.
    Vector2 aPos = a.transform.position.V2();

    // Now that we have the object's worldspace location, we offset that to the BoxCollider's center
    aPos += aCollider.center;
    // From the center, we find the top/left corner by cutting the total height/width in half and
    // offset by that much
    aPos.x -= aCollider.size.x/2;
    aPos.y += aCollider.size.y/2;

    // Create a rectangle based on the top/left corner, and extending the rectangle
    // to the width/height
    return new Rect ( aPos.x, aPos.y, aCollider.size.x, -aCollider.size.y );
}

// Converts a Vector 3 to Vector 2
private static Vector2 V2 ( this Vector3 v )
{
    // Converts the Vector3 to a Vector2.
    return new Vector2 (v.x, v.y);
}

}
19:Weapon Sway Unity3D
//============================================
// ATTACH THIS TO WEAPON
//
// ATTACH WEAPON TO PLAYER GAMEOBJECT
//============================================

using UnityEngine;
using System.Collections;

public class WeaponSwayScript : MonoBehaviour {
public float mouseSensitivity = 10f;
public float maxMoveAmount = 0.5f;
public float smoothSpeed = 3f;

private Vector3 startPos;

private float factorX;
private float factorY;

public bool bRotate;
public float smoothRotationSpeed = 2f;
public float rotateAmount = 45f;

//============================================
// FUNCTIONS
//============================================

void Start()
{
    startPos = transform.localPosition;
}

void Update()
{
    // STORE MOUSE MOVEMENT AMOUNTS, SMOOTH WITH LERP
    factorX = Mathf.Lerp(factorX, -Input.GetAxis("Mouse X") * mouseSensitivity, Time.deltaTime * 10f);
    factorY = Mathf.Lerp(factorY, -Input.GetAxis("Mouse Y") * mouseSensitivity, Time.deltaTime * 10f);

    // CLAMP LIMITS
    if (factorX > maxMoveAmount)
        factorX = maxMoveAmount;

    if (factorX < -maxMoveAmount)
        factorX = -maxMoveAmount;

    if (factorY > maxMoveAmount)
        factorY = maxMoveAmount;

    if (factorY < -maxMoveAmount)
        factorY = -maxMoveAmount;

    // SET TARGET POSITION (START POSITION + MOUSE MOVEMENT)
    Vector3 targetPos = new Vector3(startPos.x + factorX, startPos.y + factorY, startPos.z);

    // APPLY POSITION TO WEAPON, SMOOTH WITH LERP
    transform.localPosition = Vector3.Lerp(transform.localPosition, targetPos, smoothSpeed * Time.deltaTime);

    // ROTATION
    if (bRotate)
    {
        float tiltAroundZ = Input.GetAxis("Mouse X") * rotateAmount;
        float tiltAroundX = Input.GetAxis("Mouse Y") * rotateAmount;
        Vector3 target = new Vector3(tiltAroundX, 0f, tiltAroundZ);
        transform.localRotation = Quaternion.Slerp(transform.localRotation, Quaternion.Euler(target), Time.deltaTime * smoothRotationSpeed);
    }
}
}
DES加密
具体请百度,下面为封装好的类(代码细节请参考msdn):
/// <summary>
///DES加密算法
/// </summary>
public class DES
{
public DES()
{
    //
    //TODO: 在此处添加构造函数逻辑
    //
}

/// <summary>
/// 对字符进行加密
/// </summary>
/// <param name="pToEncrypt">输入字符串</param>
/// <param name="sKey">密钥,要求为8个字节共64位</param>
/// <returns>返回加密结果</returns>
public static string Encrypt(string pToEncrypt, string sKey)
{
    DESCryptoServiceProvider des = new DESCryptoServiceProvider();

    byte[] inputByteArray = Encoding.Default.GetBytes(pToEncrypt);
    des.Key = ASCIIEncoding.ASCII.GetBytes(sKey);
    des.IV = ASCIIEncoding.ASCII.GetBytes(sKey);
    MemoryStream ms = new MemoryStream();
    CryptoStream cs = new CryptoStream(ms, des.CreateEncryptor(), CryptoStreamMode.Write);
    cs.Write(inputByteArray, 0, inputByteArray.Length);
    cs.FlushFinalBlock();
    StringBuilder ret = new StringBuilder();
    foreach (byte b in ms.ToArray())
    {
        ret.AppendFormat("{0:X2} ", b);
    }
    ret.ToString();
    return ret.ToString();
}

/// <summary>
/// 对已加密字符密文解密
/// </summary>
/// <param name="pToDecrypt">已加密字符</param>
/// <param name="sKey">密钥,要求为8个字节共64位</param>
/// <returns>解密结果</returns>
public static string Decrypt(string pToDecrypt, string sKey)
{
    pToDecrypt = pToDecrypt.Replace(" ", "");//加密后的密文两位一组,组与组之间以空格隔开
                                             //这里要先去除所有空格

    DESCryptoServiceProvider des = new DESCryptoServiceProvider();
    byte[] inputByteArray = new byte[pToDecrypt.Length / 2];
    for (int x = 0; x < pToDecrypt.Length / 2; x++)
    {
        int i = (Convert.ToInt32(pToDecrypt.Substring(x * 2, 2), 16));
        inputByteArray[x] = (byte)i;
    }
    des.Key = ASCIIEncoding.ASCII.GetBytes(sKey);
    des.IV = ASCIIEncoding.ASCII.GetBytes(sKey);
    MemoryStream ms = new MemoryStream();
    CryptoStream cs = new CryptoStream(ms, des.CreateDecryptor(), CryptoStreamMode.Write);
    cs.Write(inputByteArray, 0, inputByteArray.Length);
    cs.FlushFinalBlock();
    StringBuilder ret = new StringBuilder();
    return System.Text.Encoding.Default.GetString(ms.ToArray());
}

/// <summary>
/// 加密文件
/// </summary>
/// <param name="sInputFile">源文件</param>
/// <param name="sOutputFile">加密过后的文件</param>
/// <param name="sKey">密钥,要求为8个字节共64位</param>
/// <param name="sMsg">返回信息</param>
/// <returns>是否成功</returns>
public static bool EncryptFile(string sInputFilename, string sOutputFilename, string sKey, out string sMsg)
{
    bool IsSuccess = true;
    FileStream fsInput = null;
    FileStream fsEncrypted = null;
    CryptoStream cryptostream = null;
    try
    {
        fsInput = new FileStream(sInputFilename, FileMode.Open, FileAccess.Read);
        fsEncrypted = new FileStream(sOutputFilename, FileMode.Create,FileAccess.Write);
        DESCryptoServiceProvider des = new DESCryptoServiceProvider();
        des.Key = ASCIIEncoding.ASCII.GetBytes(sKey);
        des.IV = ASCIIEncoding.ASCII.GetBytes(sKey);
        ICryptoTransform desencrypt = des.CreateEncryptor();
        cryptostream = new CryptoStream(fsEncrypted,
                                        desencrypt,
                                        CryptoStreamMode.Write);
        byte[] bytearrayinput = new byte[fsInput.Length];
        fsInput.Read(bytearrayinput, 0, bytearrayinput.Length);
        cryptostream.Write(bytearrayinput, 0, bytearrayinput.Length);
        cryptostream.Close();
        fsInput.Close();
        fsEncrypted.Close();
        sMsg = "成功";
        return true;
    }
    catch (Exception ex)
    {
        sMsg = ex.Message;
        IsSuccess = true;
    }
    finally
    {
        try
        {
            if (cryptostream != null) cryptostream.Close();
            if (fsInput != null) fsInput.Close();
            if (fsEncrypted != null) fsEncrypted.Close();
        }
        catch
        {
        }
    }
    return IsSuccess;
}

/// <summary>
/// 解密文件
/// </summary>
/// <param name="sInputFilename">输入文件(已加密文件)路径</param>
/// <param name="sOutputFilename">解密后文件路径</param>
/// <param name="sKey">密钥,要求为8个字节共64位</param>
/// <param name="sMsg">返回信息</param>
/// <returns>是否成功</returns>
public static bool DecryptFile(string sInputFilename, string sOutputFilename, string sKey, out string sMsg)
{
    bool IsSuccess = true;
    FileStream fsInput = null;
    FileStream fsDecrypted = null;
    CryptoStream cryptostream = null;
    try
    {
        fsInput = new FileStream(sInputFilename, FileMode.Open, FileAccess.Read);
        fsDecrypted = new FileStream(sOutputFilename, FileMode.Create, FileAccess.Write);
        DESCryptoServiceProvider des = new DESCryptoServiceProvider();
        des.Key = ASCIIEncoding.ASCII.GetBytes(sKey);
        des.IV = ASCIIEncoding.ASCII.GetBytes(sKey);
        ICryptoTransform desdecrypt = des.CreateDecryptor();
        cryptostream = new CryptoStream(fsDecrypted,
                                        desdecrypt,
                                        CryptoStreamMode.Write);
        byte[] bytearrayinput = new byte[fsInput.Length];
        fsInput.Read(bytearrayinput, 0, bytearrayinput.Length);
        cryptostream.Write(bytearrayinput, 0, bytearrayinput.Length);
        cryptostream.Close();
        fsInput.Close();
        fsDecrypted.Close();
        sMsg = "成功";
        return true;
    }
    catch (Exception ex)
    {
        sMsg = ex.Message;
        IsSuccess = true;
    }
    finally
    {
        try
        {
            if (cryptostream != null) cryptostream.Close();
            if (fsInput != null) fsInput.Close();
            if (fsDecrypted != null) fsDecrypted.Close();
        }
        catch
        {
        }
    }
    return IsSuccess;
}
}
Unity3D交互相关总结
Input.MouseButtonDown触屏、电脑通用,只要有按下操作,不需要collider
NGUI 中带collider的UI是可以接受到射线检测的,不过需要注意的是
void Update()
{
    if (Input.GetMouseButtonDown(0))//
    {
        Ray ray = camera.ScreenPointToRay(Input.mousePosition);
        RaycastHit raycastHit;
        if (Physics.Raycast(ray, out raycastHit))
        {
            Debug.LogError(raycastHit.collider.name);


        }
    }
}
这里相机需要用UI相机,而不是Camera.main
带Collider的UI无法响应Unity自带的OnMouseDown、OnMOuseUp、OnMouseDrag事件。
经测试用主相机渲染的带collider的UI也无法相应上述事件
几种在Unity中创建AnimationCurve的方法比较
以下内容均在Unity4.5版本中通过
1:使用编辑器创建动画
假设场景中新建了一个Cube,名字为CubeTest。
选中该Cube, 打开Animation面板,点击AddCurve按钮,出现一个“Create New Animation”的保存框: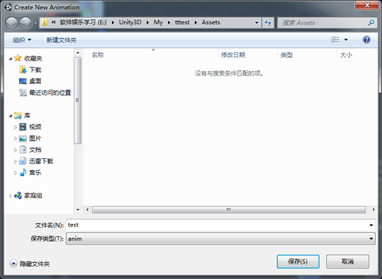
默认情况下为Cube添加了Animator组件,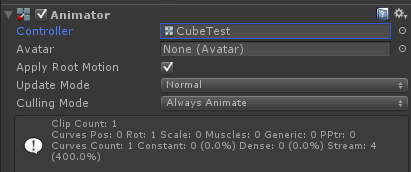
同时创建了一个AnimatorController(AnimatorController的默认名字和选中的物体名字一致),一个名字为test的anim clip片段.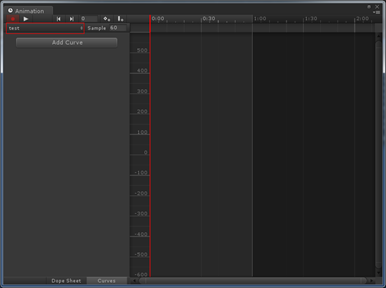
如图,可见Clip的属性也是和Animator中的Clip是一致的。
接下来为这个Clip编辑方块在5秒钟时间内旋转52°的动画。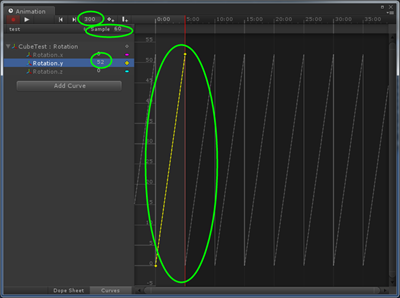
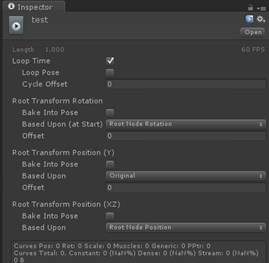
如上图:Sample代表每秒采样的次数,图示60,则上面300代表的就是5秒时间。同时在Rotation.y处修改度数为52即可。若不使用这种方法而纯粹的通过托右边区域的红线,往往会造成误差。上图中右边区域可见黄线右边还有很多重复的灰色的线段,表示该动画是Loop循环的。若要取消该循环,可以选中该Clip,然后在Inspector面板中取消Loop Time的选项 。再刷新一下Animation面板,发现灰线消失:
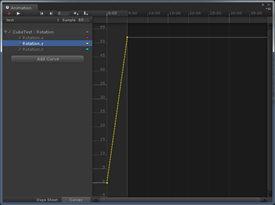
若要仍使用老版本的Animation动画组件。则必须先为Cube添加Animation组件,然后再打开Animation面板->AddCurve。这个时候创建的Clip便是符合Animation组件的动画片段了。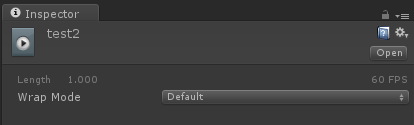
可以通过设置WrapMode来调整动画的循环方式。
2:使用脚本创建动画
依旧以上述Cube为例。新建一个Cube
2.1 AnimationCurve
2.1.1编辑AnimationCurve
新建一个脚本,拖拽到Cube上。代码如下:
public class test : MonoBehaviour
{
    public AnimationCurve curve;

    void Start()
    {

    }

    void Update()
    {

    }
}

点击上述红色处,便打开AnimationCurve编辑面板
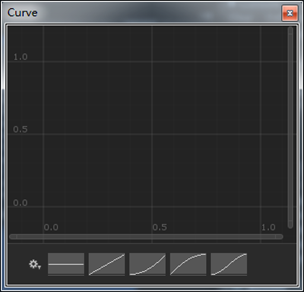
选中一种线形后,如图
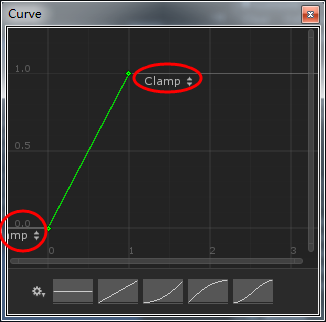
红色区域,可以选择循环的方式,包括:Loop,Clamp,Pingpang。像1中Animation编辑界面一样,这里也可以为动画线添加Key,设置弯曲等等复杂的操作。
最终如图,做了一个5秒,52个单位的动画,并且动画循环方式为Pingpong。下面需要用代码把Curve对应到旋转上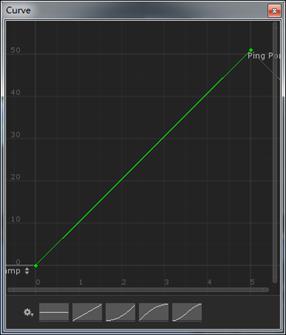
最终代码如下:
public class test : MonoBehaviour
{
    public AnimationCurve curve;

    void Start()
    {

    }

    void Update()
    {
        transform.eulerAngles = new Vector3(0, curve.Evaluate(Time.time), 0);
    }
}
2.1.2 代码创建AnimationCurve
下面使用代码来完成2.1.1中的Curve细节的创建
public class test : MonoBehaviour
{
    AnimationCurve curve;

    void Start()
    {
        //curve = AnimationCurve.Linear(0, 0, 5, 52);
        curve = new AnimationCurve();
        curve.AddKey(new Keyframe(0, 0));
        curve.AddKey((new Keyframe(5, 52)));
        //两种设置Curve的方式都可以。
        //第一个调用静态方法来设置(开始时间、开始值、结束时间、结束值 )
        //第二个是先构造函数实例化Curve,然后添加Keyframe(time,value);

        curve.preWrapMode = WrapMode.Clamp;
        curve.postWrapMode = WrapMode.PingPong;
    }

    void Update()
    {
        transform.eulerAngles = new Vector3(0, curve.Evaluate(Time.time), 0);
    }
}
2.2 Animation
可以发现上述2.1中动画的播放没有使用到Animation组件,而是使用的AnimationCurve. Evaluate(float time)方法来根据时间对应相对的值。
其实也可以使用Animation组件来播放动画,这里以2.1.2中的curve为例。
代码如下:
public class test : MonoBehaviour
{
    void Start()
    {
        AnimationCurve curve = AnimationCurve.Linear(0, 0, 5, 52);

        AnimationClip clip = new AnimationClip();
        clip.wrapMode = WrapMode.Loop;
        clip.SetCurve("", typeof(Transform), "localRotation.y", curve);

        animation.AddClip(clip, "test");
        animation.Play("test");
    }
}
经测试不生效,表现为y rotation瞬间从0变成180。
把localRotation.y改成localPosition.y可行。
改成localScale.y也不可行。表现为localScale.x和localScale.z变成了0。然后在y上缩放。
具体支持的string字符串参见文档,反正是不支持诸如rotation.y之类的。
搞不清楚什么原因,TODO:
3:综合实例
需要实现这样一个功能,实例化某个物体后,物体先下降,然后反弹,最后再下降到底部。
首先考虑到Animation编辑器,对Y轴进行编辑,结果如下
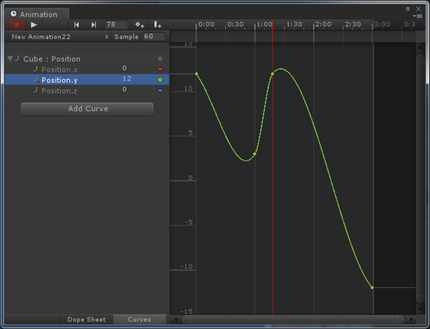
该图共有4个节点(0,12),(1,3),(1.3,12),(3,-12)
然后使用该动作,问题出来了。该动作限制了Position.x为0,因此无论初始化使用这个animation clip的物体在什么地方,都会强制使得position.x变成0。
为了解决这个问题,必须使用程序,两套curve,一个模拟图示的曲线控制y的位置。一个用来控制x的位置为初始化位置。
代码如下:
float xPos;
void Awake()
{
    xPos = transform.position.x;
}

void Start()
{
    /*模拟Y轴上的位移动画*/
    AnimationCurve curveY = new AnimationCurve();
    curveY.AddKey(new Keyframe(0f, 12f));
    curveY.AddKey(new Keyframe(1f, 3f));
    curveY.AddKey(new Keyframe(1.3f, 12f));
    curveY.AddKey(new Keyframe(3f, -12f));
    //curveY.SmoothTangents(0,)//默认AddKey后,经测试程序里面就是按照布泽尔曲线拟合的

    /*X轴上保持初始化位置*/
    AnimationCurve curveX = new AnimationCurve();
    curveX.AddKey(new Keyframe(0f, xPos));
    curveX.AddKey(new Keyframe(3f, xPos));

    /*添加自毁函数*/
    AnimationEvent aniEvent = new AnimationEvent();
    aniEvent.functionName = "DestroySelf";
    aniEvent.time = 3f;

    AnimationClip clip = new AnimationClip();
    clip.wrapMode = WrapMode.Once;
    clip.AddEvent(aniEvent);
    clip.SetCurve("", typeof(Transform), "localPosition.y", curveY);
    clip.SetCurve("", typeof(Transform), "localPosition.x", curveX);
    animation.AddClip(clip, "supplyAnimation");
    animation.Play("supplyAnimation");

}

void DestroySelf()
{
    Destroy(gameObject);
}
Unity3D中的多线程
如上图,通过开启一个子线程来打印,这样打印窗口既不会造成堵塞(即不会挂起后蜂涌打印,而是很平滑的依次循环打印),也不会造成update中的堵塞。
问题来了,若退出程序,子线程仍然在工作的话,就应该关闭子线程。网上有说设置IsBackground属性为true,可以在主线程退出时,子线程也会退出,但是试了一下不行。
考虑通过在OnApplicationQuit事件中,调用Abort()方法来退出线程,试了一下依旧不行,在退出主线程后,子线程依旧执行。
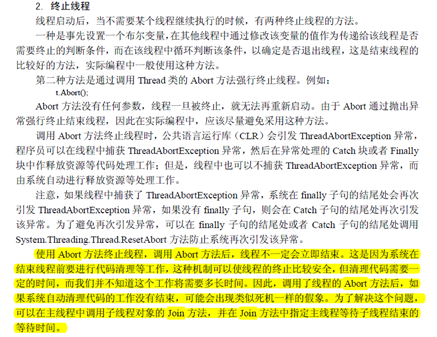
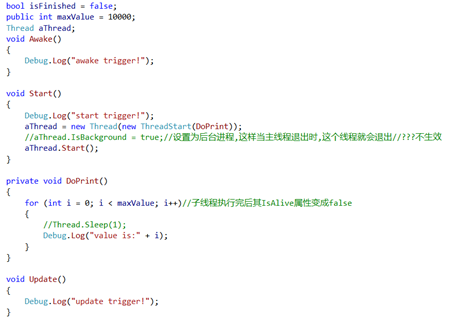
试了一下,在子线程循环中开启Thread.Sleep(一个很短的时间),abort终止线程便生效。但这种方法肯定不可取。如图:
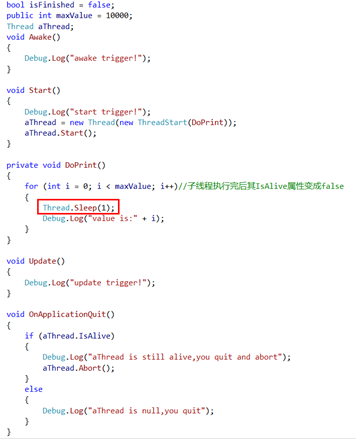
再测试了通过bool变量来控制线程的执行,可取,如下代码:
bool isQuit = false;
public int maxValue = 10000;
Thread aThread;
void Awake()
{
    Debug.Log("awake trigger!");
}

void Start()
{
    Debug.Log("start trigger!");
    aThread = new Thread(new ThreadStart(DoPrint));
    aThread.Start();
}

private void DoPrint()
{
    for (int i = 0; i < maxValue; i++)//子线程执行完后其IsAlive属性变成false
    {
        if (isQuit)
        {
            return;
        }
        Debug.Log("value is:" + i);
    }
}

void Update()
{
    Debug.Log("update trigger!");
}

void OnApplicationQuit()
{
    if (aThread.IsAlive)
    {
        isQuit = true;
        Debug.Log("aThread is still alive,you quit and abort");
    }
    else
    {
        Debug.Log("aThread is null,you quit");
    }
}
ogg、ogv格式转换
1 在线工具
http://www.online-convert.com/
2 TheoraConverter
老软件了,好几年没有更新了。
2.6版本的多了格式选择,其它的没有详细比较。。。
我的网盘提供了1.1,2.6两个版本的 http://pan.baidu.com/s/1mhqFPri
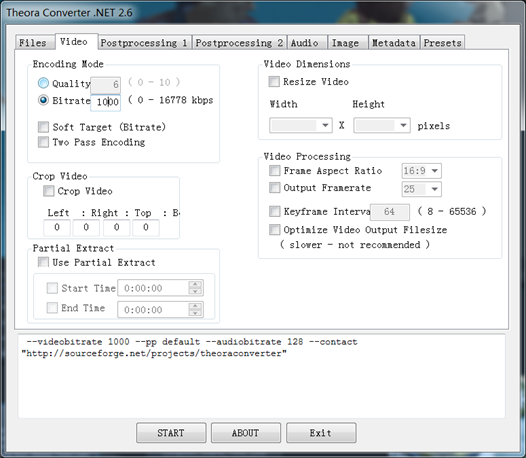
如图为2.6的截图,第二个选项卡“Video”里面EncodingMode默认就是Bitrate 1000
若用默认值,转出来的视频马赛克严重,故该值越大越好,范围为后面小括号内的值。
另外也可以选择Quality,默认值是6,测试结果还可以。这个值越大越清晰,当然视频的大小也会大一些。。。
3: iDealshare VideoGo
这个没有测试,!!!蛋疼
http://www.idealshare.net/video-converter/ogv-converter-for-mac-windows.html
4:vcl视频播放软件和miro Video Conterter软件
http://www.mirovideoconverter.com/
经过测试vcl和miro converter转换后的ogg(ogv)分辨率不行而且丢帧严重
DontDestroyOnLoad
该方法可以保证在跳转场景的时候不销毁某个物体。
比如场景A,场景B,场景A中有一个cube,通过在cube上添加脚本DontDestroyOnLoad,使得从A场景跳转到B场景的时候cube依旧在B场景中。这样就带来一个问题,当再次进入A场景的时候便会有两个cube,如此反复导致意外的事情。
解决方法如下:
void Awake()
{

    DontDestroyOnLoad(this);

    if (FindObjectsOfType(GetType()).Length > 1)
    {
        Destroy(gameObject);
    }
}
Unity3D优化相关总结
以下所有内容来自网络和个人日常学习、工作总结。欢迎交流:546722522
Google_IO_2014_Unity游戏优化
很好的一个国外Unity优化指南,提供了一些更深层次的优化指南。
PPT下载地址:http://pan.baidu.com/s/1hreCzoo
GPU瓶颈可以根据GPU类型选择合适的工具来进行分析:
CPU时间衡量:
通过Profiler检查Camera.Render的时间
创建脚本,使用OnPreCull、OnPostRender、OnGUI来具体分析
OnPreCull是时间戳的开始、OnPostRender是时间戳的结束、OnGUI用来显示结果
Unity3D 图片格式和出包大小之间的关系
本文以PC平台说明。所用素材为:http://pan.baidu.com/s/1sOuK2/
情况一:
一张jpg图片分辨率1024*768,在PC上占用的空间为762KB。
复制50张。
1:放到StreamingAssets目录下
打包后,50张图在生成的包的StreamingAssets目录下,且每个图片的空间为762KB。
StreamingAssets目录大小为37.2MB。即没有压缩、没有二进制打包。StreamingAssets目录下的保持原样。在Unity中改变图片的纹理压缩格式,对打出的包的大小没有影响,即只和原始格式有关。
2:放到Resources目录下
图片的纹理格式为RGB ETC1 4bit时,每个图占用内存384KB(逐像素算,不同于外存中图片大小的算法)。384*50=19200
再看最终resources.assets文件大小为19208KB(18.7MB)。即约等于每个图片的内存大小之和。
情况二:
对该jpg图片进行压缩。
本人使用Sage Thumbs的右键快捷方式:转换为jpg,把50个图片转换了一下(保持尺寸不变),每个图片在PC的存储空间从762KB变成184KB。
再放到StreamingAssets下打包,StreamingAssets包的大小变为8.99MB。
放到resources目录下打包,依旧使用RGB ETC1 4bit。最终结果依旧为19208KB(18.7MB)。
综上:图片若是放在StreamingAssets目录下,尽量减少图片的占用空间,从而减少包的尺寸。
Resources目录下打包,图片最终占用空间和其最终运行时占用的内存一致,即跟其纹理压缩格式有关。另外Resources目录打包后是以二进制格式保存的,比较安全。
情况三:
打assetbundle
回到每张图外存762KB的情况,使用RGB ETC1 4bit (每个图384KB)的纹理压缩格式。对每个图打成assetbundle,每个assetbundle大小为200KB。
再使用RGB 16bit(每个图占用1.5MB)的纹理压缩格式,每个图的assetbundle大小为470KB。
再使用RGB 16bit的纹理压缩格式,再把图片外存改成184KB(按照上述情况二所述),打出的assetbundle大小为582KB。
综上:可见assetbundle大小也和纹理压缩格式有关,纹理压缩格式占用空间越大,bundle也越大。相对来说assetbundle在纹理压缩的基础上还进一步压缩了,从而减少大小。
另外和原始外存压缩格式也有关,具体关系本人也没有深究。
由于assetbundle一般不放到Resources目录下,所以这里不讨论放到Resources目录下的情况。
(实际上我也测试了一下,把assetbundle单独放到Resources目录下,打出的包没有resources.assets这个文件)